Showing posts with label DIY. Show all posts

DIY Succulent Gift


These next few days I'm bringing you some simple DIY gift ideas for Christmas. Since RJ and I are on a tight schedule this year because of flying, and well, he has a huge family to buy for. I did my best to keep things minimal this year. Today I wanted to show you a cheap and simple way to make a succulent gift.


What you need: Baby succulents, mason jars, rocks, & Cactus soil.

Fill the mason jars with rocks about 1/4 of the way. I added the rocks so that the water has somewhere to go. Since theres no holes at the bottom.

Fill in the dirt, but leave enough room to put the plant in. Fill in the rest with dirt.

I watered it enough so that the soil was moist.

This gift was a total of about five dollars. I already had the mason jars, I buy some whenever I see them because I use them a lot. I believe they were a dollar at the dollar store. The cactus were two dollars at Lowe's. I already had the rocks and dirt! So this was a really affordable and cute gift.

Perfect gift for someones office or home :)

Fathers Day Star Wars Shirts


I made these fathers day shirts using my silhouette Cameo and I can't believe how great they came out. I was seriously nervous about using my machine to cut vinyl because I hadn't only used it in the past for card stock. But after looking at some tutorials online and with some help from friends, I managed to make three perfect shirts for all the boys. Can you believe that I didn't have to pay a dime for the images either? One of the cool things that silhouette allows you to do is pull any image from anywhere and turn it into a project. My mind is seriously blown and I can't wait for another project, T-shirts for everyone! 


Here are some of the images I pulled from the internet to make the shirts. Just so you can have an idea about how awesome this thing is! I plan on giving a tutorial in the future about how you convert them into t shirts. All you need is a t-shirt, vinyl, and your computer. The design studio literally allows you to create anything you can think of, its amazing. My husband loved the shirts and they all looked so cute wearing them. 

What were some of your fathers Day ideas? 


DIY Ring Light for under $40


I made this ring light a few weeks back, and thought I would quickly share the tutorial with you guys. Its super simple and way cheaper than buying an actual ring light which can cost anywhere from $100-$300. This tutorial has the stand included with is awesome if you're not facing a wall and need a stand. Below is the full tutorial that explains how to make it.

Supplies:
Wire wreath (18 or 20in)
aluminum foil
Paper towel holder (metal)
zip ties
crazy glue
LED lights (I used 2 for the 20inch, you can get away with 1 for the 18in) (I used http://amzn.to/2o2XxX6)
Power Adapter http://amzn.to/2nQCW7q

Its a suer simple process and I don't think you really need pictures. So I will just write the steps.

1. Cover the wreath in aluminum foil until it is completely covered. I just take pieces and cut them off then wrap them around a section of the wreath until it is all covered in aluminum. It serves to reflect the light and as a base to put your lights on.

2. Put the lights on the aluminum foil in a circular pattern, the back is sticky. You will need to connect them if you're using more than one set of lights. Its simple but it can seem tricky, heres a video that explains it well.

3. After you stick the lights on and connect them, you will connect them to the power adapter. Plug it in to make sure it works.

4. After all that you can attach the stand (paper towel holder). You just attach it with zip ties. Theres no method. I just put a whole bunch until it was steady and didn't fall. Ha.

Theres a lot of tutorials using different lights. Even though it might be simpler these are the best lights I found for making videos.

Feel free to ask me any questions you might have.

Happy DIYing!

Chalk Guide {what chalk to use on chalkboards}


Happy Friday! I'm on my way to downtown, but I wanted to leave you with a chalk guide. I love all things chalkboard and chalk. It's just so fun to me. If I could, I would have an entire chalk wall. Unfortunately for now I'm stuck with making chalkboards. I made one here and most recently made a chalkboard easel, that was really cheap and easy to make. Today I'm going to be sharing the different types of chalk you can use on your chalkboards. As well as the positives and negatives of both.

 This is probably my least favorite. I threw it out a week after I bought it.  I know they have different types of  chalk marker (fine, chisel, chunky). I bought the "regular" one at Michaels. This gives you the  best  look. Its like drawing with a marker. It doesn't give you a chalk look, its more of a fine marker look . What I didn't like  hated about it, was that it doesn't fully come off. I still have residue on my (new) chalkboard. So I would definitely not recommend using this unless its for a permanent board. Although it does wipe off within a few minutes of using it. I might have just left it too long. It was a few days. 
This is a picture of what the marker looks like. The nicely written fine parts are in marker. 


The chalk pencil is my second favorite. It works like a led pencil. I bought this one at Joann's. Its a fine chalk and It's good for drawing and writing. The downside, it erases easily and can be hard to see. You have to get the chalk at the right angle in order for it to write. But it gives you a lot of freedom if  you're good with a pencil.

You can also use a fabric pencil (if its chalk). I feel like they work the same way.
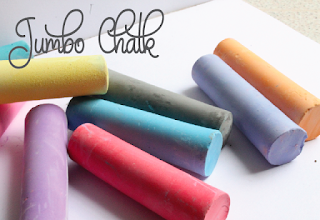


Jumbo chalk or sidewalk chalk. I know this chalk can be hard to write with but it comes in handy if you use this technique to draw on your chalkboards.
Regular chalk is my favorite to use and the easiest in my opinion. I like the size and the look that it gives. This one is good if you have good penmanship (which I do not).


I was going to give different samples of the chalk but I think you get the idea and I'm sure you have seen most of these. I just wanted to share some pros and cons of the different types.

If you're having a hard time figuring out how people make those beautiful chalk images these links will help. Here is a technique, which I think is the easiest (also shared above). Here is one on fake calligraphy. Here is a harder, more time consuming one, but I think the technique is good.

Hope you enjoy! If you have any questions feel free to comment or email me, or if you have any other ideas on how to do it, please share!

Have a great weekend :)

DIY Facial Scrub


Happy Friday! Today I wanted to share with you a DIY Facial scrub. This is a very simple and cheap way to scrub your face. All you need is Lemon and Sugar. You can use brown or white. Just make sure your sugar is organic and fine, since you will be scrubbing it on your face.
This is my absolute go to facial scrub! It is a really great exfoliator, my skin always feels smooth afterwards. Some of the benefits of lemon and sugar are...

Lemon: Vitamin C, Natural exfoliator, helps lighten age spots, evens out skin, natural astringent, tightens pores, brightens complexion. 

Sugar: Natural Exfoliator, Evens out skin tone, cleans pores, removes dead & dull skin.


^^All you need to do is mix the sugar and lemon until you get a syrup consistency^^ You want to make sure you don't make too much since you can't save it for more than 3 days (stored in fridge). 

Rub it all over your face. Make sure to really get the problem spots where you get black heads and white heads. Keep it on for 5-10 min. It should dry, and feel almost like you can peel it. Then wash your face and moisturize it with lotion or coconut oil (to go natural). Coconut oil is a great all natural moisturizer. It is also antimicrobial, anti fungal, and antibacterial. 

Some things to remember! Don't go out into the sun with this. Only leave on for 5-10 min. Don't use it on open cuts or wounds. Don't use it if it irritates your skin. Make sure not to fall asleep with it. After all, it is sugar, the ants might eat your face while you're sleeping. Seriously, that is one of my biggest nightmares!! Kind of gross, sorry. 

Comment or email me if you try it :) Enjoy! 


" "